Configuring Connections
When starting andFHEM the first time some dummy data is used for previewing what the application looks like and what devices are supported. To use your own FHEM server open the navigation drawer and click into the drop down menu on the top. This selector always shows the name of the connection that is currently used for fetching data from a FHEM server.
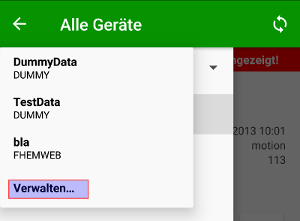
After clicking the selector a submenu opens. This submenu contains all configured connections. When clicking a connection name, the current connection changes to the newly selected one. When selecting the bottom item, which is called "Manage" or "Verwalten", you are directed to a view where you can manage your connections.
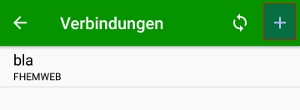
All the configured connections are listed here. When clicking such a connection, you can edit all configured connection items like URL, username or password. You can also create a new one by clicking on the plus sign on the top.
Changing a configuration or adding a new one always looks the same, except that you cannot change the connection type when editing a connection.
 |
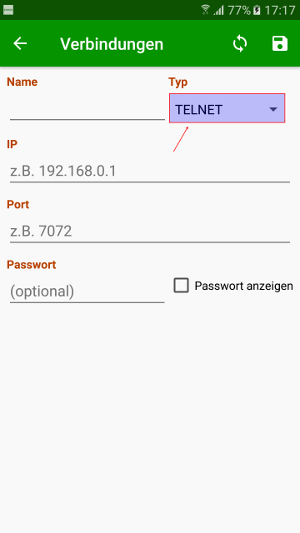 |
Enter your credentials and click "Save" or "Speichern". When leaving the configuration view with the back key and reentering the collection list selector, you can select your newly created connection.
FHEMWEB
FHEM supports some web interfaces delivered together with the server itself. One of these web interfaces is FHEMWEB, which is configured by adding a line like define fhemweb FHEMWEB 8083 global to your fhem.cfg. Before any data within andFHEM, make sure that you can access the web interface in a browser, either on your smartphone or on another computer. You should see a web page like the following:
The same address you just entered is expected by andFHEM in the URL field within the FHEMWEB preferences. Trailing slashes do not matter. The username and password fields can be filled optionally. They are required if you want to authenticate yourself using basic authentication. If you do not know what this means, stop reading here and leave the fields empty.
If you want to use the authentication feature you have to make sure that your fhem.cfg contains a line like attr fhemweb basicAuth aj38219cnake. For information how to create the string after basicAuth, continue reading here. Now just enter your username and password in andFHEM.
Telnet
FHEM supports a very basic command line interface to query the current state of devices. Before selecting this option, make sure that you can access the interface from another computer in your local network.
When using Windows, download Putty and start the program. Select telnet as connection option, enter the address of your FHEM server and add the specified port in your FHEM configuration. The port defaults to 7072. When clicking hitting the button to open the connection, a black window opens up. Hit two times enter to see the FHEM prompt showing up. If this works, andFHEM is also able to connect to FHEM.
If not, make sure that your fhem.cfg contains a line such as the following: attr global port 7072 global. 7072 is the port used for opening up the command line interface. Global specifies that computers can connect to the server without connecting from the computer running the FHEM server.
When the above connection is successful you can enter the configuration data in andFHEM in the appropriate fields. The IP field should contain something like 192.168.0.1. It is the address of the computer running the FHEM server. Port is the above mentioned FHEM command line interface port, such as 7072.
Firebase Cloud Messaging
Firebase Cloud Messaging (FCM), formerly Google Cloud Messaging (GCM) enables you to send push notifications to Android handsets. This allows to send updates and messages in near-realtime.
Installation Steps:
- Install the gcmsend module by either
- Downloading the 98_gcmsend.pm manually and copy the file to the FHEM directory
- or issuing
update add https://raw.githubusercontent.com/klassm/andFHEM/master/fhem_modules/controls_gcmsend.txt
within the FHEM console. This approach will update the module automatically whenever I upload a new version.
- Make sure that your Perl installation meets all the dependencies. FHEM will tell you if
it can load the module, especially when issuing
reload 98_gcmsend
The module depends on two perl modules, which have to be installed to fhem/lib/perl5/site_perl/5.12.2/ (on FritzBoxes, otherwise choose your perl directory) - Create a FCM project.
- Go to https://console.firebase.google.com
and create a new project.

- Enter the required project details.

- Hit the gear button and jump to project settings.
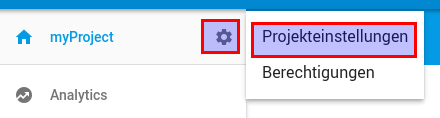
- Select cloud messaging. This page contains our required server key ("api key")
and the required "sender-id".

- Go to https://console.firebase.google.com
and create a new project.
- Now we create a GCM device. Issue
define <gcm_device_name> gcmsend
within your FHEM instance. - Afterwards we need to configure the device to talk to FCM. This is why we have to issue
another FHEM
command:
attr <gcm_device_name> apiKey <apiKey>
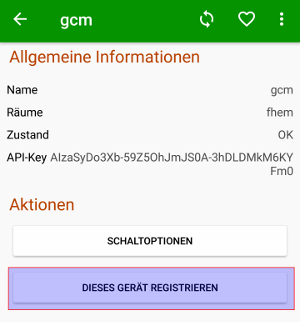
whereas <gcm_device_name> is the name of the device you created before and <apikey> is the key you just created within the Google console (number 2 within the image). - Link andFHEM
- Open the settings of andFHEM and look for a setting called "Cloud Messaging Sender-ID". Enter the sender-id of the created FCM project.
- Refresh your xmllist and look for your GCMSend device you just created. Open the
detail page and
click the button to register your device. Internally, andFHEM will add your
device as regIds
attribute of your gcm device.

Client Side Certificates
You can enforce your webserver to ask for a certificate. Only if the clients has access to the correct certificate, the webserver will allow access to the resource (details).
To configure andFHEM to use those certificates, you have to copy them to your Android device. Afterwards, startup the configuration screen of your FHEMWEB connection and scroll down. You will find a checkbox to enable client side certificates.
Below that checkbox, there are two selectors for the respective certificates. The client certificate is expected to be in p12 format. The server certificate relates to the CA certificate and is expected to be in PEM format. Please note that only those certificate formats are supported. All other formats will fail to work in combination with andFHEM.